
How to Install W-Type Rubber Fenders?
W-type rubber fender, recognized as a high-performance marine protective component, features a distinctive W-shaped cross-section with multi-cavity arch structure. It delivers high energy absorption and low reaction force, widely deployed on tugboats, work vessels, barges and port quay walls. This release elaborates on the complete production workflow, marine application scenarios, step-by-step installation procedures and long-term maintenance standards of W-type rubber fenders, offering professional technical reference for port and marine engineering operators globally.
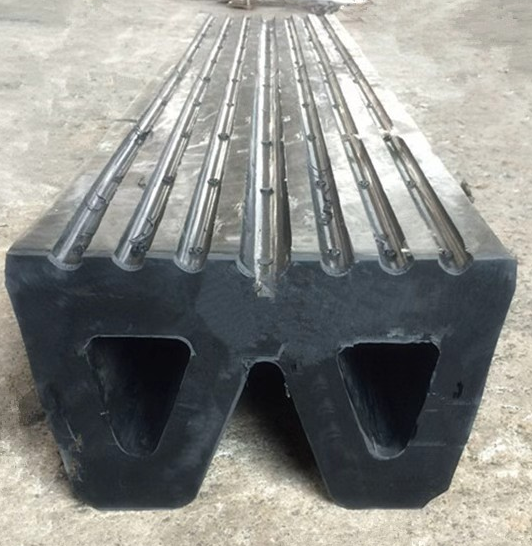
W-type rubber fenders adopt high-performance natural rubber compound as the base material, mixed with carbon black, anti-aging agent, vulcanizing agent and reinforcing additives, to achieve excellent seawater corrosion resistance, ozone resistance, abrasion resistance and elastic recovery performance. The whole production flow includes compounding, extrusion, vulcanization, finishing and quality inspection.
1. Raw Material Compounding & Kneading Natural rubber and auxiliary agents are precisely proportioned according to marine rubber formula. The materials are fully mixed via internal mixer to form homogeneous rubber compound. The hardness, tensile strength, elongation and aging resistance of the compound are tested in lab before proceeding to next procedure. The formula is customized to resist UV, salt spray and repeated impact under ocean environment.
2. Continuous Extrusion Forming The qualified rubber compound is fed into extruder. Under constant temperature and pressure, the extruder squeezes the rubber through precision W-shaped die to form the integrated W profile with multi-cavity structure and top anti-slip rib grooves. Continuous extrusion supports unlimited custom length, which reduces joint seams and weak points compared with segmented molded fenders. Pre-drilled mounting bolt holes are reserved during forming.
3. Vulcanization Curing Extruded W-shaped rubber blank enters vulcanization tank or continuous microwave vulcanization line. Under controlled temperature and pressure for scheduled curing time, cross-linking reaction takes place inside rubber molecules. This step stabilizes the mechanical property: after vulcanization, the fender can maintain stable elasticity under repeated compression, without permanent deformation. Vulcanization parameters are strictly monitored to avoid under-cure or over-cure.
4. Finishing, Inspection & Certification After vulcanization, edges are trimmed, surface burrs removed. Full inspection is carried out: dimensional check, visual inspection for bubbles, cracks or surface defects. Random sampling is conducted for physical performance test (energy absorption, reaction force, compression set, tensile test). Qualified products can obtain marine third-party certificates including ABS, DNV, CCS, BV, LR to meet international port and ship project requirements.
W-type rubber fender’s W dual-cavity arch design enables progressive compression. When vessel berths or pushes, the multi-arch structure deforms sequentially to absorb impact energy, while keeping low reaction force transmitted to hull and quay structure. The top ribbed contact surface reduces sliding friction during berthing.
1. Tugboat & Workboat Bow / Stern Protection This is the most typical application. W fenders are mounted on tug bow and stem. During pushing operation, the fender contacts the target vessel hull, disperses concentrated impact load, prevents hull steel plate denting and scratching. It can adapt to curved hull surfaces and tolerate shear force from transverse sliding between two vessels.
2. Port Quay, Ro-Ro Terminal & Ferry Berth Installed horizontally on concrete or steel quay walls, especially for terminals with frequent vessel berthing. It accommodates different vessel drafts and tidal variation. Suitable for barges, small cargo ships, passenger ferries.
3. Offshore Platform, Bridge Pier & Jetty Corner Protection Used at vulnerable corners of marine structures to buffer collision from drifting vessels.
Two mainstream installation solutions: through-bolt fixed installation (heavy-duty high-impact area) and anchor bolt embedded installation.
1. Confirm fender model, dimension and mounting hole pitch match drawing. Check rubber body for cracks, cuts or damage after delivery.
2. Clean the mounting base surface (concrete quay / steel hull plate). Remove rust, sharp protrusions, marine fouling and loose debris to ensure flat contact surface.
3. Prepare hardware: hot-dip galvanized anchor bolts, nuts, washers, backing steel plates. All fasteners shall be anti-corrosion treated for marine environment.
4. Mark positioning lines according to layout drawing, confirm elevation and spacing. Avoid misalignment of bolt holes.
1. For concrete quay: drill holes and install embedded anchor bolts / chemical anchor bolts. For steel hull: pre-weld backing plate and reserve bolt positions.
2. Lift W-type fender, align the prefabricated mounting holes with anchor bolts, pass bolts through fender body and backing plate.
3. Tighten nuts in cross sequence gradually, to guarantee uniform compression of fender base. Do not over-tighten to avoid local rubber stress concentration.
4. Continuously install adjacent fender sections. Keep small gap between two fender units, avoid extrusion collision between fender ends under compression.
5. After full installation, inspect all bolt torque, check that fender fits tightly against base without hollow gap. Test compression to confirm no twisting or detachment risk.
6. Optional accessory: UHMW-PE wear plate can be fitted on fender contact face to reduce friction coefficient and extend service life.
Installation Notes: W fenders can be mounted horizontally or vertically based on site working condition. Horizontal mounting is preferred for quay wall; vertical mounting is common on tugboat bow.


Copyright © Whale Marine Product Co.,Ltd. All Rights Reserved | Sitemap| Powered by 