
How to install and maintain pneumatic rubber fender?
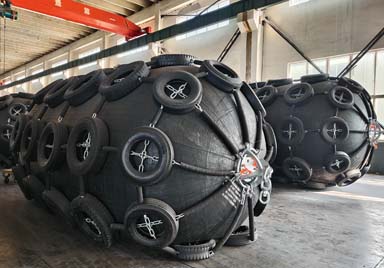
Pneumatic rubber fenders are core anti-collision protective equipment for modern ports, terminals and offshore floating facilities. Featuring excellent cushioning performance, light weight and convenience for ocean-going transportation, they are widely exported to port projects across the Middle East including the UAE and Saudi Arabia. Delivered fully deflated and compact-packed for shipment, the fenders shall be inflated and properly installed on-site upon arrival at destination ports. Standardized post-commissioning maintenance helps extend service life and guarantee safe vessel berthing.
1. Unload fenders onto flat, clean ground. Remove sharp stones and metal edges to avoid scratches on rubber bodies, protective tire-and-chain sleeves.
2. Full visual inspection: Check rubber hull for dents, scratches or tears caused by ocean transit. Verify protective tires, connecting chains, shackles and lifting lugs for deformation or damage. Confirm inflation valve is intact with undamaged threads.
3. Cross-check nameplate data: Confirm design working pressure and rated inflation pressure. Over-inflation is strictly prohibited.
Note: Inflation without prior damage check may lead to bulging, air leakage and safety hazards.
Important notice: Use only clean compressed air. Oxygen or flammable gas is forbidden. Operators shall wear proper PPE; keep personnel clear of fender perimeter during inflation.
1. Lay the fender flat on soft even ground. Remove all packing straps and allow natural relaxation. Do not drag the rubber body forcibly.
2. Firmly connect inflation hose to dedicated inflation valve and ensure air-tight sealing at joints.
3. Low-pressure pre-inflation: Pump air to 0.02-0.03 MPa and stop. Inspect overall shape; check rubber surface and valve assembly for air bubbles / leakage. If leakage occurs, fully deflate and repair before resuming work.
4. Gradual pressure build-up: Increase pressure in 2-3 stages. Never fill to full pressure in one single operation. Pause for 5-10 minutes after each pressure rise to release internal rubber stress evenly.
5. Inflate to the rated working pressure marked on nameplate. Close valve and tighten valve protective cap. Let stand for 30 minutes and re-check pressure. Obvious pressure drop indicates leakage requiring troubleshooting.
6. Hoisting and installation can only start after successful inflation. Never hoist a fully-deflated fender, otherwise internal cord layers will suffer permanent fracture.
1. Select proper lifting tools: Use original lifting lugs together with matched shackles and slings. Add protective padding where slings contact rubber; steel wire ropes shall not rub directly against rubber surface.
2. Hoist inflated fender steadily to pre-defined berth position.
3. Connect mooring chains: Fasten both-end lifting lugs to pre-embedded terminal anchor chains / counterweights / anti-fall chains. Leave reasonable slack so the fender can float and swing freely under vessel berthing impact.
4. Clearance verification: Maintain gaps between fender and quay wall as well as between adjacent fenders to prevent mutual squeezing and collision during berthing.
5. Commissioning test: Perform light-contact berthing test with empty vessel. Observe compression deformation and chain load status; confirm no interference or abnormal friction before formal operation.
· Monitor working pressure: Natural pressure loss happens over time. Re-inflate when pressure drops below 90% of rated value; release surplus air in case of over-pressure.
· Visual check: Inspect rubber surface for cuts, bulges and ageing cracks. Check outer protective tires for falling-off and chains for corrosion & wear.
· Fasten connecting hardware: Check shackles, lifting lugs and anchor chains for wear, deformation and loose connections. Retighten as required.
1. Rinse salt deposits and oil contamination from fender surface with fresh water. Salt in seawater accelerates rubber ageing. Do not apply strong corrosive chemical detergents on rubber.
2. Inspect valve sealing and protective cap condition to avoid seawater corrosion on valve threads.
3. Apply anti-corrosion lubricant on chains and metal fittings to mitigate salt-fog corrosion at seaside terminals.
1. Full visual survey: Check rubber body for deep cracks and exposed cord layers. Repair or replace fenders with severe ageing or exposed reinforcement cords.
2. Pressure holding test: Inflate to rated working pressure and hold for 24 hours. Record pressure variation. Excessive pressure drop indicates hidden air leakage points.
3. Nondestructive inspection for metal components: Focus on lifting lugs and shackles for cracks. Replace parts whose wear exceeds manufacturer specifications.
· Keep slight low internal pressure; neither fully deflate nor store under full rated pressure.
· Store away from direct sunlight, oil contaminants and sharp objects. Cover with waterproof & sun-proof tarpaulin for outdoor storage. Avoid heavy loads pressing against rubber hull.
1. Never inflate beyond the maximum working pressure shown on nameplate. Over-pressure may cause fender burst with severe safety risks.
2. Prevent sharp structures on vessels from scraping rubber main body during berthing.
3. In case of puncture and air leakage, evacuate surrounding personnel first and deflate slowly. Do NOT perform repair work under pressurized condition.
4. Slow down pressure-rising rate further under low-temperature winter conditions. Cold rubber becomes rigid; rapid pressurization will damage internal reinforcement layers.


Copyright © Whale Marine Product Co.,Ltd. All Rights Reserved | Sitemap| Powered by 